Introduction
Visual Studio developers have enjoyed the speed and consistency of visual designers for controls since the pre-.NET days of Visual Studio. In the world of Microsoft Office Server 2007 Web Part development, developers have no visual designer available for the development of WebParts. This means dynamically loading controls or concatenating a large number of strings in order to render even the simplest controls. (One could also use XSLT, but that discussion is for another day). We are not quite ready to give up the intuitive and speedy development visual designers offer.
Visual Studio does offer the ability to design User Controls, including Web User Controls. But these controls cannot be used as SharePoint WebParts and personally, I want to do just that. This article will introduce the concept of creating distinct components (Web Particles) that together provide the full benefit of SharePoint WebParts while still allowing the use of the familiar and productive visual designers available to Web User Control developers. I refer to these components (tongue in cheek) as "WebParticles" since each one is just a portion of the functionality ultimately provided by the WebPart.
Overview
We will need to create a Visual Studio Web Application project, create a Web User Control (ASCX), a class that can act as the Web Part interface to our ASCX Web User Control and a ASP.NET web page in which we can test and debug our components.
Creating the ASP.NET Web Application
In Visual Studio, create a new ASP.NET Web Application (new web site will NOT work for this exercise). For the project name, enter
SmartParticles*.

Since we are developing this part for SharePoint, we will need a reference to
SharePoint.dll. If you are developing on a machine having MOSS or SharePoint Services installed, this file is typically located in the
%CommonProgramFiles%\Microsoft Shared\Web Server Extensions\12\ISAPI Directory. In my case the expanded path is
C:\Program Files\Common Files\Microsoft Shared\Web Server Extensions\12\ISAPI\Microsoft.SharePoint.dll. If you are developing on a machine not having SharePoint or MOSS, you will need to copy this file along with
Microsoft.SharePoint.Search.dll and
Microsoft.SharePoint.Search.xml from the same directory to a directory on your local computer. In either scenario, select the
Microsoft.SharePoint.dll and set a reference to it in your project. Visual Studio will include the proper files in your project output.

Next, add a Web User Control file to your project and name it
WebParticleControl.ascx.

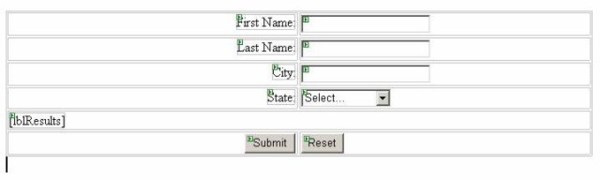
In the control designer, add three Textboxes, a drop down Control, a Label and two Buttons as follows:
| Control | Name | Notes |
| TextBox Control | txtFirstName |
|
| TextBox Control | txtLastName |
|
| TextBox Control | txtCity |
|
| DropDownList Control | ddlState | add a few items of your choice to this control |
| Label Control | lblResults |
|
| Button | btnSubmit | Change Text property to "Submit" |
| Button | btnReset | Change Text property to "Reset" |
I also created a table to organize the controls and labels for the text boxes, but that exercise is optional.
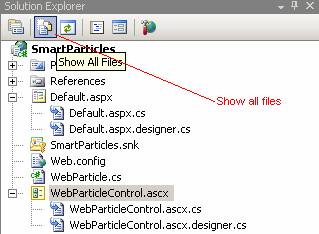
Double-click the Submit button to generate the stubbed-out
btnSubmit_Click event handler in the code-behind file (
WebParticleControl.ascx.cs). If you cannot see this file, ensure that "Show All Files" is toggled on in Solution Explorer:
In the
btnSubmit_Click event handler, enter this code:
 Collapse
string _response = "Hello {0} {1} from {2}, {3}! Please reset the form!";
string szState = ddlState.SelectedValue; lblResults.Text =
string.Format(_response, txtFirstName, txtLastName, txtCity, szState);
Double-click
btnReset to generate the Click handler and enter this code in the
bntReset_Click handler:
Collapse txtCity.Text = "";
txtFirstName.Text = "";
txtLastName.Text = "";
ddlState.SelectedIndex = 0;
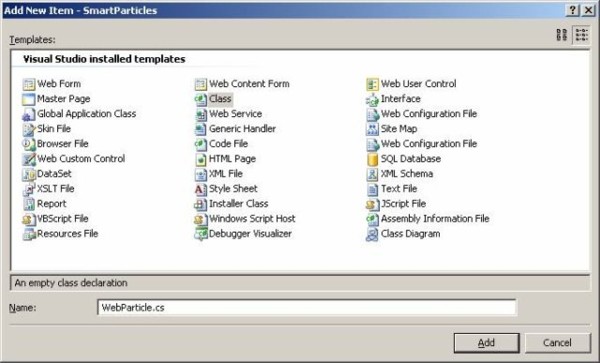
Next, add a class file to your project named
WebParticle.cs.
To summarize this class, it will inherit from the
Microsoft.SharePoint.WebPartPages.WebPart and override the
CreateChildControls and
RenderContents methods to load and render the ASCX Web Control we created in the preceding steps. This class will inherit from the
Microsoft.SharePoint.WebPartPages.WebPart class, so you will need to add the correct
using directive to your namespace or class section.
Collapse using Microsoft.SharePoint.WebPartPages;
Set the inheritance of the class to WebPart:
Collapse public class WebParticle: WebPart
I have defined two properties which together determine the location from which to load the associated Web Control ASCX file. If you wish to simply inherit from this class, just override these property declarations, one of which defines the source directory and the other defines the filename hosting your control.
Collapse protected string UserControlPath = @"~/usercontrols/";
protected string UserControlFileName = @"webparticlecontrol.ascx";
Next, the class will override the
CreateChildControls method to load the Web Control. In this method, the control is loaded from the source file by the Page property inherited from
System.Web.UI.Control via
Microsoft.SharePoint.WebPartPages.WebPart. The Page property allows programmatic access to the underlying ASP.NET Page instance hosting our WebPart in SharePoint.
Collapse protected override void CreateChildControls()
{
try
{
_control = this.Page.LoadControl(UserControlPath + UserControlFileName);
Controls.Add(_control);
}
catch (Exception CreateChildControls_Exception)
{
_exceptions += "CreateChildControls_Exception: " + CreateChildControls_Exception.Message;
if (AlwaysBubbleUpExceptions)
{
throw;
}
}
finally
{
base.CreateChildControls();
}
}
Next, we will override the
RenderContents method which is specific to the
WebPart class from which we inherit. This method was chosen because in the life cycle of SharePoint web pages, by the time this method is called all prerequisite processing will have taken place, including the creating and assignment of SharePoint variables and the
CreateChildControls method. There is no need to call
EnsureChildControls here since child controls will always exist when this method is called by the SharePoint ASP engine.
Collapse protected override void RenderContents(HtmlTextWriter writer)
{
try
{
base.RenderContents(writer);
}
catch (Exception RenderContents_Exception)
{
_exceptions += "RenderContents_Exception: " + RenderContents_Exception.Message;
if (AlwaysBubbleUpExceptions)
{
throw;
}
}
finally
{
if (_exceptions.Length > 0 && AutoWriteExceptions)
{
writer.WriteLine(_exceptions);
}
}
}
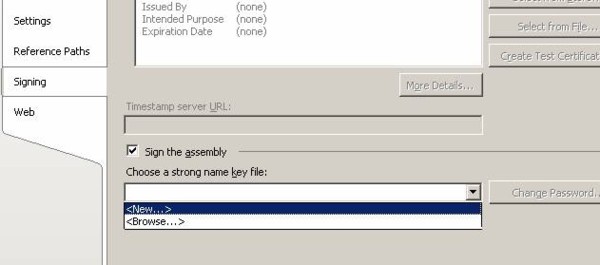
Signing and Building the Project
We are not quite ready to build our class. Since we intend this WebPart and Web User Control to live in Microsoft Office SharePoint Server and the Global Assembly Cache, we will need to assign a Strong Name key and sign the control. In Solution Explorer, right-click the SmartParticles project node and select Properties. The Project Property Pages appear. Select the Signing tab from the choices on the left. Check the "Sign the assembly" box and select
from the "Choose a strong name key file" drop down list.
Enter "
SmartParticles.snk" in the "Key file name" field. Uncheck the box marked "Protect my key file with a password" unless, of course, you want to password-protect your key file (not a bad idea).
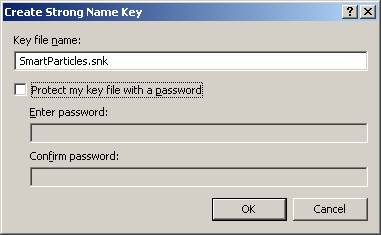
Click "OK". The
SmartParticles.snk Strong Name Key file is added to your project. Now, build the project using the Visual Studio Build menu.
Deploying your WebPart and Web User Control
Creating a SharePoint WebPart is relatively simple compared to deploying one. Since we are using the WebParticle approach, we have to deploy both an ASCX file and the compiled DLL that contains the supporting class for the ASCX Web User Control and the class that will actually be the SharePoint WebPart. Here is a summary of what we need to do in order to deploy our WebParticles:
Summary
- Compile the project
- Copy the ASCX Web User Control to your /UserControls/ directory (or your selected directory)
- Copy the compiled DLL into the Global Assembly Cache
- Discover the
publicKeyToken property of our assembly
- Add the appropriate
SafeControl entries for each of our classes in SharePoint's web.config file
- Add an assembly element to the assemblies section of SharePoint's web.config file
- Create a SmartParticles.WebPart XML file with necessary information for deployment to SharePoint
- Upload the SmartParticles.WebPart XML file to SharePoint's WebPart gallery
- Test the part's installation
Compile the project
Use the Visual Studio Build menu to build your project.
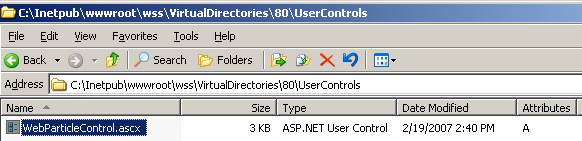
Copy the ASCX Web User Control to the /UserControls/ directory (or your selected directory)
First you will need to ensure that your target SharePoint web site has an
UserControls directory. If not, create it. Then copy the ASCX file from your project directory to your SharePoint
UserControls directory.
Copy the compiled DLL into the Global Assembly Cache
The Global Assembly Cache (GAC) is a special folder located at
%WINDIR%\Assembly where
%WINDIR% is the full path to your Windows folder (such as
C:\Windows or
C:\Winnt). Use Windows Explorer to copy your DLL into the GAC folder.
Discover the publicKeyToken property of our assembly
Remember adding a Strong Name Key to our project? The result of this is that our Assembly is strongly named, meaning is has a Public Key token. Microsoft came up with this strategy to combat "DLL Hell" that used to plague COM/COM+ Developers back in the day. If you've never heard of DLL Hell, it means that Microsoft has done a very good job in their efforts to make our lives easier. I'm not complaining, but there is one more thing they could have done for developers: give us the ability to view our project's public key token directly in Visual Studio. Maybe my next project will be an add-in... Anyway, there are two ways you can discover your DLL's public key token. Since we copied our assembly into the GAC, the public key will be plainly visible to us if we look. Just use Windows Explorer to browse to your
C:\Windows\Assembly folder (or
%WINDIR%\Assembly if Windows is not installed in the default location). Scroll down and find the SmartParticles assembly:
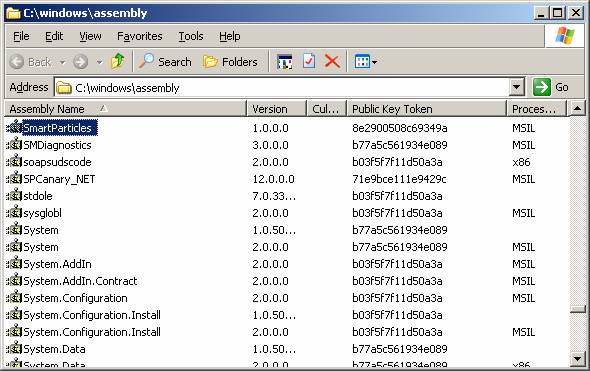
As you can see, our version information and Public Key Token are plainly visible. Still, you will have to copy it into a text file by hand for our next step. Alternatively, you can use .NET Reflector by Lutz Roeder at
http://www.aisto.com/roeder/dotnet/ to browse to your assembly's DLL file and read out the Assembly information and Public Key Token with no hassles and the ability to cut and paste.
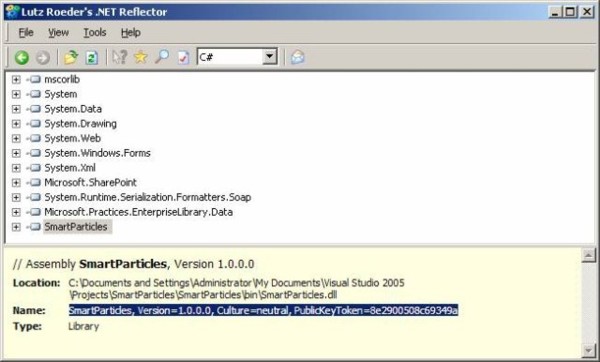
If you built the project with the Strong Name Key included with the source code, you have it easy: just copy the lines below onto your clipboard.
Collapse SmartParticles, Version=1.0.0.0, Culture=neutral,PublicKeyToken=8e2900508c69349a
We have two tasks that require this information. First, we must let SharePoint know that our control is Safe. To do this, we will need to edit the
web.config file of our SharePoint site. Use your favorite text editor to browse for and open your site's
web.config file. You will see a section named "SafeControls" with a number of default entries provided by Microsoft. You will need to add the following entries under "SafeControls":
Collapse <SafeControls>
....various Microsoft entries.....
<Assembly="SmartParticles, Version=1.0.0.0, Culture=neutral, PublicKeyToken=8e2900508c69349a"
Namespace="SmartParticles" TypeName="WebParticle" Safe="True"/>
<SafeControl Assembly="SmartParticles, Version=1.0.0.0, Culture=neutral, PublicKeyToken=8e2900508c69349a"
Namespace="SmartParticles" TypeName="WebParticleControl" Safe="True"/>
<SafeControl Assembly="SmartParticles, Version=1.0.0.0, Culture=neutral, PublicKeyToken=8e2900508c69349a"
Namespace="SmartParticles" TypeName="*" Safe="True"/>
</SafeControls>
Replace the
PublicKeyToken with the token from your assembly (if you did not use the included
StrongNameKey file).
Add an assembly element to the assemblies section of Share Point's web.config file
You would think that would be enough but, no, SharePoint still does not know enough about your types to load them. It does not check the SafeControl section until it loads the Assembly using Reflection. First, it must understand how and where to load your assembly. You could place your assembly in your Share Point's
bin folder, but then you would have two copies to update each time you built or modified your assembly. Best to leave it in one place, the GAC, and keep things simple. The way to do this is to tell SharePoint about your assembly and the way to do that is to add an assembly reference to the
web.config file. Every ASP.NET
web.config file has a compilation section, and SharePoint is no exception. Find the compilation section of your SharePoint site's
web.config file. Beneath it you will see an assemblies section with at least an entry for SharePoint beneath it. Add a node for your assembly using the same information from the assembly that you discovered earlier:
Collapse SmartParticles, Version=1.0.0.0, Culture=neutral, PublicKeyToken=8e2900508c69349a
Here are the entries, replace the public key token if needed.
Collapse <compilation batch="false" debug="false">
<assemblies>
<add assembly="Microsoft.SharePoint, Version=12.0.0.0, Culture=neutral,
PublicKeyToken=71e9bce111e9429c" />
<add assembly="SmartParticles, Version=1.0.0.0, Culture=neutral,
PublicKeyToken=8e2900508c69349a" />
</assemblies>
</compilation>
Create a SmartParticles.WebPart XML file with necessary information for deployment to SharePoint
A WebPart xml file is a very simple, structured text file with the minimum information needed to add your WebPart to the WebPart gallery in SharePoint. Use Visual Studio to add an XML file to your project. Name the file
SmartParticles.WebPart:
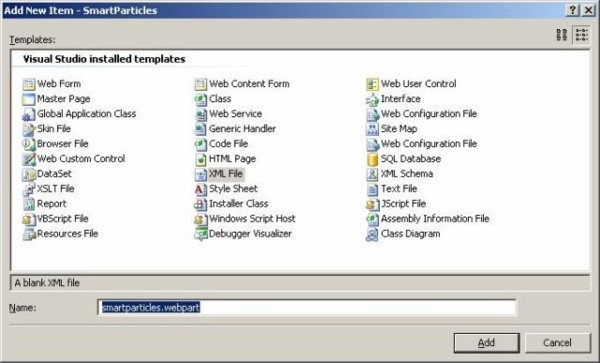
Paste the following code into your XML file:
Collapse WebPart files can be much larger and complex, but this simple file illustrates our simple web part. The sections that are important for our demonstration are the type section and the Title and Description property sections. In the type name section, you must enter the name of your
WebPart class, in this case
SmartParticles.WebParticle, followed by the assembly information we have already copied twice into
web.config. You can put any strings you want into the Title and Description properties. The string that is in the Title property becomes the default title for your WebPart when it is added to a SharePoint page. Save your changes and close the file.
Upload the SmartParticles.WebPart XML file to Share Point's WebPart gallery
Next, we need to import (or upload) into SharePoint the WebPart file we created in the previous section. You will need to be a SharePoint administrator to perform this task. If you have a dedicated SharePoint Administrator upon whom you can offload this task, you are lucky. If not, browse to your SharePoint site. Under "Site Actions" select Site Settings, Modify All Site Settings.
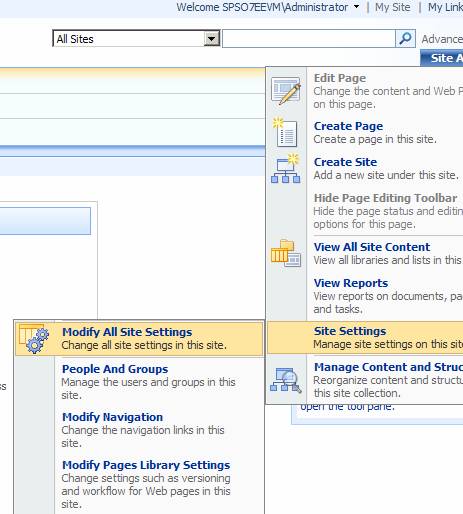
On the Site Settings page, under Galleries, click Web Parts
In the Web Part Gallery, click Upload, then Upload Document:
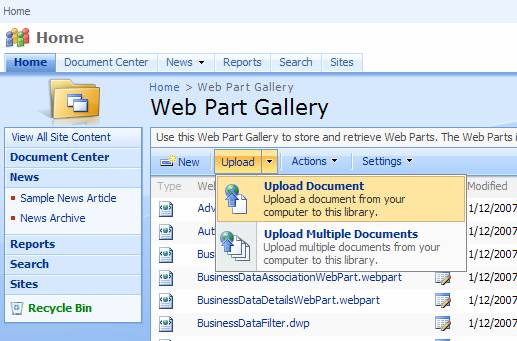
In the form that appears, browse to your Project folder for your
SmartParticles.WebPart file, then click Upload to upload it. When it has uploaded, the Web Part Gallery Edit Item page is displayed. You will see (and can change, if you like) the information entered into your WebPart XML file. In the Group section, I recommend added your WebPart to a non-Default group to make it easier to find. There are a lot of WebParts that come with Microsoft Office SharePoint Server 2007 directly out of the box!
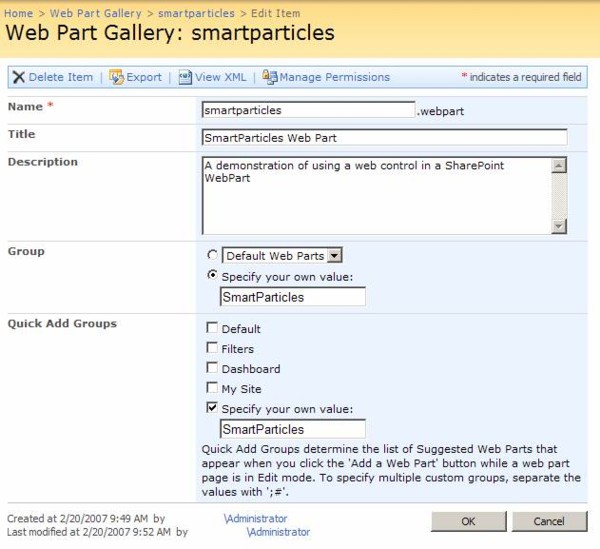
When you are done, click "OK". You will be returned to the Web Part gallery where you will see that your part has been installed. It will be decorated with the "New!" splash.
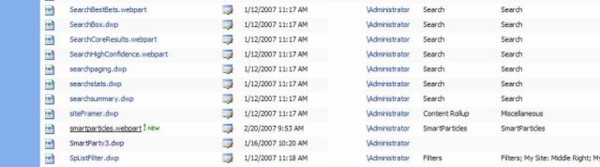
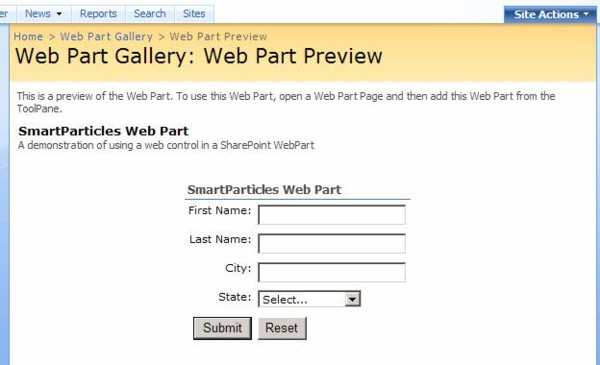
Test the part's installation
You can now test that your WebPart is installed by clicking its name (as shown in the preceding figure). This will take you to the Web Part Preview page. Here, as the name implies, you can preview your part; you cannot test your Web Part's functionality in the Web Part Preview page. For example, if you click the buttons in the Preview, the page will reload and nothing else will happen. Just thought I would let you know so you wouldn't freak out about it.
If your WebPart blew up or would not install, verify that you followed all of the procedures in order before wailing and gnashing your teeth (or contacting your humble narrator). Don't worry, there is a short, but hopefully effective, troubleshooting guide near the end of this document.
Using your WebPart
To test or use your WebPart, you will need to add it to a SharePoint page just like you would any other WebPart. This will be very simple since we have added our WebPart to the Web Part Gallery. To summarize:
- Edit a SharePoint page
- Select a zone into which you want to place your WebPart
- Add the WebPart to the zone
- Save the page
This is what SharePoint is all about. So easy a caveman user can do it! [would have put a caveman graphic here, but do not like lawyers banging on my doors]
Edit a SharePoint page
Under site actions, select Edit Page.

Click on a zone and select "Add Web Part". The Add Web Part dialog will be displayed:
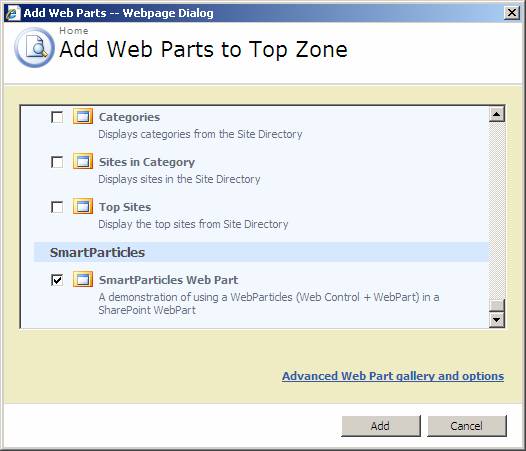
Scroll down and find the
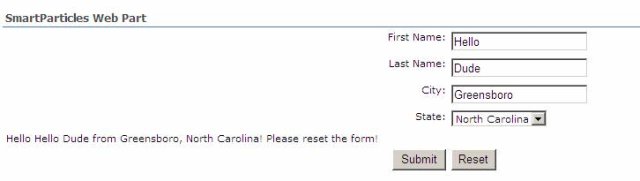
SmartParticles Web Part, select it and click "Add". Publish your page so everyone can see it. Your web part will now be fully functional on your SharePoint page.
"Hello, Dude!"
* Yes, it is a take-off on
SmartPart, the excellent tool for SharePoint created by Jan Tielens, et al.
Troubleshooting
Access Denied or "File.IO" Permissions exceptions
If, like me, you run your Visual Studio from My Documents, when you copy files from this location on an NTFS partition using Copy and Paste in Windows Explorer, you also copy the ACL (Access Control List) with these files. Files in My Documents, including these, are not accessible by SharePoint. When you copy files from this location into your SharePoint site directory if they are both on the same volume (logical drive such as
C:\), the permissions will also be copied and SharePoint will not be able to load either the DLL or the ASCX files. You will get the ubiquitous "Access Denied" message in SharePoint which is not very helpful. For more information about ACL copy problems, see
http://support.microsoft.com/kb/320246. Fortunately, there are a couple of easy workarounds. The easiest is to work on a separate volume such as another hard drive. Alternatively, copy the ASCX to another hard drive and then to your SharePoint directory of choice. You may only want to do this if you are getting the Access Denied error. Then again, better to prevent than solve problems.
Cannot load type Assembly.TypeName
Be sure you added an assembly reference to your assembly in Share Point's
web.config file. Did you add your assembly to the GAC? If you did both of these things, try adding your assembly to the bin folder of your Share Point site.
Cannot import the WebPart Exception
Verify that you have added a
SafeControl entry in Share Point's
web.config file. See "Access Denied or File.IO Permissions exceptions".
Nothing happens when you click your control's buttons
Ensure that this line is present in your Class's
CreateChildControls method.
Collapse Controls.Add(_control);